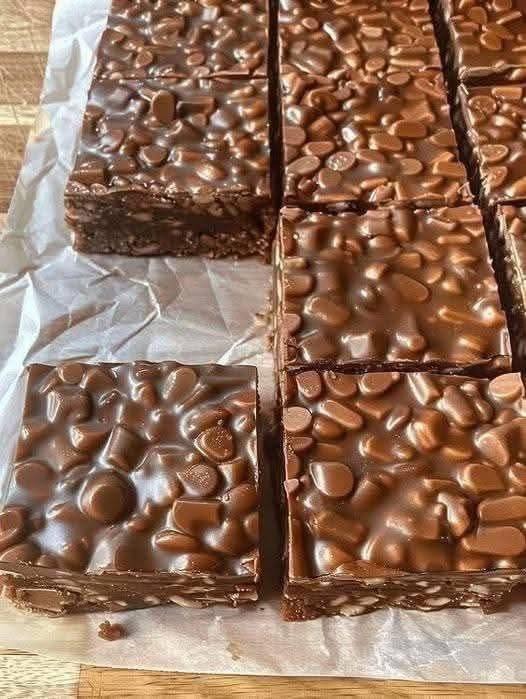
Some recipes are passed down not because they are complicated or impressive, but because they are exactly right — the kind of thing that shows up in a metal holiday tin with the recipe scribbled on a card inside, and that people ask about every single year without fail. These Caramel Chocolate Crunch Bars are that recipe. A chewy, golden oat base pressed into the pan, a layer of silky melted caramel poured over the top, chocolate chips scattered across the surface, and then a crumble of the reserved oat mixture to finish — baked until everything has just set into something rich, chewy, and completely addictive. They are the kind of bar that disappears from the plate before they have finished cooling, and that everyone assumes required more effort than it actually did.
The technique is a classic one from American church cookbook baking: a single oat mixture serves as both the base and the crumble topping, which means no separate crust recipe and no separate streusel. You make one batch of the oat mixture, press most of it into the pan, bake the base briefly, add the fillings, top with the reserved crumble, and return to the oven. The result is a bar with real textural complexity — a firm bottom layer, a molten caramel center, pools of melted chocolate, and a crumbly top that gives slightly when you bite into it before the caramel pulls through. These are genuinely among the best bar cookies that exist, and they are easier to make than they look.
Ingredients
For the Oat Base and Topping
- 2 cups all-purpose flour
- 2 cups quick-cooking rolled oats — quick oats produce a more cohesive, finer-textured crumble than old-fashioned rolled oats, which can remain slightly chewy and separate in the finished bar. Old-fashioned oats will work but the texture of the crumble topping will be chunkier
- 1 and a half cups packed brown sugar — light or dark; dark brown sugar produces a deeper, more molasses-forward flavor that pairs particularly well with the caramel
- 1 cup (2 sticks / 225 grams) margarine or unsalted butter, melted — butter produces a richer, slightly firmer result than margarine; both work well
- 1 teaspoon baking soda
- Half a teaspoon fine salt
For the Caramel Layer
- One 11-ounce bag (about 50 pieces) individually wrapped soft caramels, unwrapped — Kraft caramels are the standard choice and melt reliably into a smooth, pourable sauce. Do not use caramel sauce from a jar, which is too thin and will not set properly during baking
- 3 tablespoons water or heavy cream — water produces a slightly thinner caramel; cream produces a richer, more luscious result. Either works
For the Chocolate Layer
- 1 and a half cups semi-sweet chocolate chips — dark chocolate chips work equally well for a less sweet, more intense chocolate flavor
Instructions
Step 1: Prepare
Preheat your oven to 350°F (175°C). Lightly grease a 9-by-13-inch baking pan. Do not line with parchment — the original recipe calls for an ungreased pan, but a light coating of cooking spray helps the base release cleanly after baking and cutting.
Step 2: Melt the Caramels
Unwrap all the caramels and place them in a small saucepan with the water or cream over low heat. Stir constantly and patiently — caramels melt unevenly and the mixture will look lumpy before it becomes smooth. This process takes 8 to 12 minutes over low heat; resist the temptation to increase the heat, as caramel scorches quickly. Once the mixture is completely smooth and pourable, remove it from the heat and set aside. It will remain pourable for 15 to 20 minutes while you prepare the oat base.
Step 3: Make the Oat Mixture
In a large mixing bowl, combine the flour, quick-cooking oats, brown sugar, melted butter or margarine, baking soda, and salt. Mix with a fork or your hands until a uniform, crumbly mixture forms — it should hold together when pressed but crumble apart when released. Reserve exactly 1 cup of this mixture and set it aside for the topping. Press the remaining mixture firmly and evenly into the bottom of the prepared pan. Use the bottom of a measuring cup or a flat spatula to press it down into a compact, uniform layer.
see you next page
